My first Zippy Top was actually what I think fancy fashion seamsters would call a “wearable muslin”—a test run that turned out to be something I could actually wear outside of the house. My second attempt was…the opposite of that.
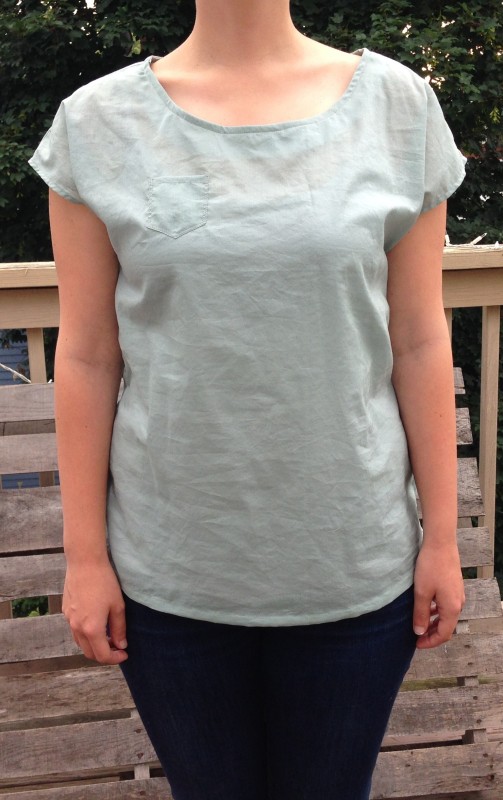
Check it out, guys: I MADE SCRUBS.

In the other versions I’ve seen, the Zippy Top (a See Kate Sew pattern) looks modern and cute. On me, it looks…plain. (A friend’s comment about my first version: “very nice! but could use a little more decolletage.”) I mentioned last time that I might add a pocket for visual interest, but as we can clearly see here, no dice.
Part of this awkwardness can definitely be attributed to my fear of working with prints (hello, “natural” colored muslin! hello, timid green cotton lawn that in retrospect was definitely not a good choice for this pattern!). Another part of it can be chalked up to my still-in-their-infancy sewing skills, which mean my neckline isn’t as crisp as it good be. Yet another part is probably how I’m shaped: this top doesn’t seem to sit well on my narrow shoulders.
More evidence of the awkwardness:
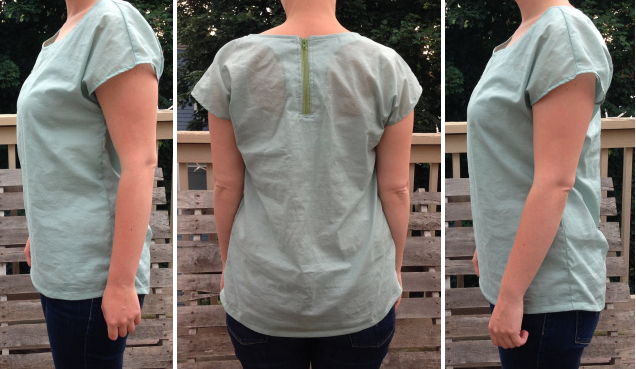
Aside from the general “I’m designed to camouflage puke” appearance, a couple of specific oddities:
Moment of truth: I have no idea which way is the “right” way to line up the side seams, as all the pattern says is to “match front and back side seams with right sides together.” Experienced seamsters, HALP. Notice all the wrinkling/pooling around the armscye*, both front and back? I had a little less of this last time, when I matched the side seams from the bottom up (meaning the hemmed edge of the arm opening overlapped quite a bit from front to back) before sewing them together. I suspected that the fact that I had hem overlap in the armpit area meant I did it wrong last time, so this time, I matched the side seams up starting at the front and back end of each arm opening, meaning the bottom hem was uneven but the ends of the arm opening matched up. Given the extra wrinkling around the arms in this version, though, I’m now wondering if I did things correctly last time, and maybe the front and back pattern pieces aren’t correctly drafted to match. Or, more likely, I am awkwardly shaped (see above).
Second: there is a lot (a lot a lot) of extra fabric hanging out in the back. Again, an open call to experienced garment makers: should I be blaming this on some weirdness of my own spine? And if so, how do I fix it?
Finally: what a horrible, horrible fabric choice for this top. Lawn is among the recommended fabrics, but this green isn’t doing me any favors. On top of the iffy color, it’s also completely see-through, meaning the facing creates a weird racerback effect. Also: SO MANY WRINKLES. I finished ironing this literally five minutes before taking pictures.
I suspect all issues (barring the fabric-related ones) are the fault of either my inability to correctly interpret patterns or my inability to correctly adjust patterns to fit my body (which is the whole point of sewing one’s own clothing, so this is something I’ll eventually learn how to do. Any and all pointers to good resources welcome). But to sum up: I won’t be wearing this in public, unless I’m attending in costume as a surgeon.
* Fancy seamster word for “armhole,” which, upon reading out loud to myself, I realize needs a fancy synonym. Way to go, seamsters.
Zippy Top #2: Scrubs Edition
PATTERN: The Zippy Top from See Kate Sew
FABRIC: “Pale Jade Green Lawn” from Denver Fabrics, which appears no longer to be available. This pale green lawn is similar.
NOTIONS: 8″ avocado green YKK zipper from Zipit, 100% cotton thread purchased at Gather Here
TIME: Somewhere between 90 minutes and two hours on Friday morning to cut out and do everything but hem; 20 minutes tonight to hem.