Weekend project: Zippy Top

I’ve had See Kate Sew’s Zippy Top printed and ready to go for at least a month now, but I’ve been too busy to tape it together, cut it out, and actually make the thing. I also had some concerns about the overall shape and length, and wanted to do a test run before I cut into the navy lawn I’ve been saving for this.

I had some time yesterday morning, so I went for it. The pattern is quick to tape up—the pages don’t overlap by much, so I didn’t bother cutting off the margins (I did this for the Date Night Dress, and it was easily the most time consuming part of the whole project).

Kate includes a shorten/lengthen line, so I took the liberty of adding four inches. I’ve seen quite a few versions of the top online, and depending on the person, the hemline falls anywhere between “jeans waistband” and “just north of the hips.” I like my tops a little longer, so I wanted to create some room to play.

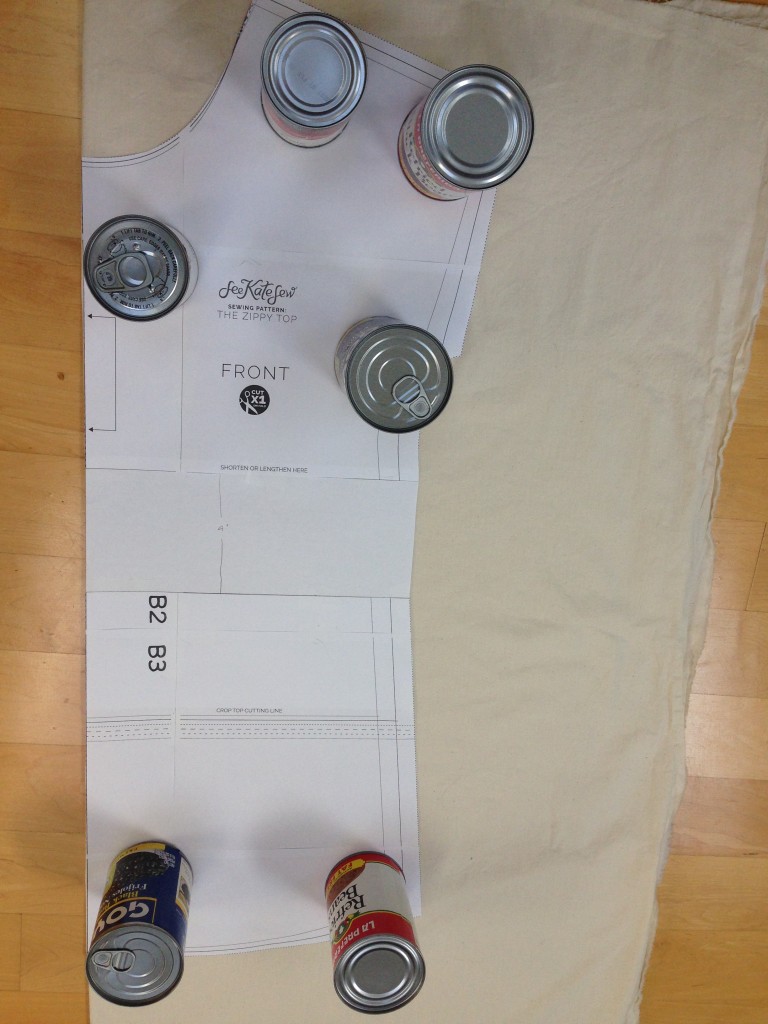
Speaking of playing: I took this opportunity to experiment with “pattern weights.” (Mr. Jones came home midway through and very gently asked why all of our beans and tomatoes were in the bedroom.)

Zippy Top

The top, as promised, is incredibly quick to put together, even if you (like me) use French seams (for fun!). It’s also forgiving if, say, you (like me) read the 3/8″ seam allowance as 5/8″ and end up making everything a tiny bit smaller on accident (oops). I started taping the pattern together at around 9:30 and had a top in hand and ready to wear to the SoWa Open Market by 12:15, where I bravely wore it into Grey’s Fabric & Notions and ended up evangelizing the pattern to the very friendly proprietor.

Zippy Top

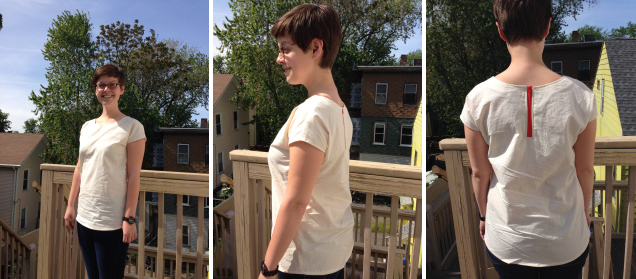
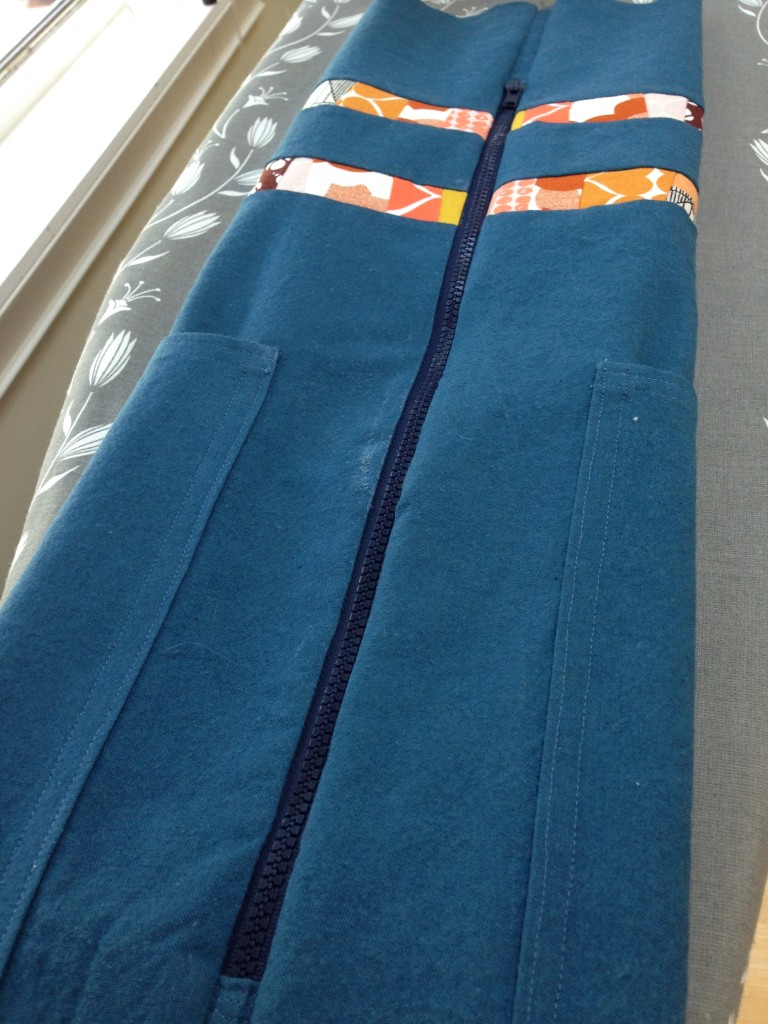
I used a speckled cream natural muslin I had laying around and a red-orange zipper from Zipit—the goal was only to test out the fit, but I ended up liking the combination enough to add this to my closet. Overall, it’s a fairly simple top—I think I like the print versions I’ve seen better, and I might add a pocket or something to perk this up a bit. Lengthwise, adding 4″ put it at perfect tunic length for me, but the muslin felt a little too Little House on the Prairie for me at that length, so I decided at the last minute to cut around 3″ off. It hits me a tiny bit below my hip bones, which I like, so I’m planning to add an inch to future versions. I think adding this tiny bit of length reduces the potentially boxiness a bit (though the super lightweight fabric also helped), which for me is a bonus.

Verdict: wrinkly, but otherwise quite lovely!

Umbrella Prints Trimmings Competition 2014

I’m pretty sure I screwed up my time zone conversions and am submitting this a few hours late, but OH WELL. I had fun.

The Umbrella Prints Trimmings Competition was a surprisingly interesting challenge. The total amount of fabric you receive is pretty slim, so it takes some creativity to figure out how to make the most of it. My goals were:

  1. Do something I hadn’t done before: namely, improv piecing.
  2. Make something I’ll use (almost) every day: a bag for my yoga mat, with pockets so I’m not awkwardly stuffing my jacket pockets full of keys, wallet, phone, and a water bottle.
  3. Showcase the Umbrella Prints fabric as well as I can.

My approach to showing off the (awesome) fabric was to combine the bright yellows and oranges and firey crimsons of the “Earth” packet I chose with a muted blue canvas, so they would really pop. My approach to improv piecing was to just run with it. My approach to making a yoga mat bag was also to just run with it, which turned out to be the hardest part of this whole thing.

So first: the fabric.

Gorgeous, right? The second I saw the Earth packet I knew that’s the one I’d be using.

Once I opened up the packet and ironed out the few wrinkly bits, the improv piecing bit came easily. I found this post by Kelly of My Quilt Infatuation to be helpful in bolstering my courage, and then I pretty much went for it. My goal was to end up with two long strips of randomly assembled bits of fabric.

Next step: throw caution to the wind, ignore the many excellent patterns and tutorials out there, and decide you want to a) use a zipper; b) have that zipper be shorter than the length of your bag; c) draft a pattern entirely from scratch.

The pocket and strap bits went well, as did inserting the strips.

I even managed to insert the zipper without too much fuss!

Umbrella Prints Trimmings Competition 2014

And then I crashed hard into the brick wall of “yoga mats, once rolled up, aren’t actually that bendy” and “cotton canvas, especially when lined, isn’t actually that stretchy.” In other words: see how the zipper is centered along the length of the bag? I could slide my mat into one end, but in order to slip the other end of the bag up over the mat and zip up the bag, I needed to bend the rules of matter.

Fail. I almost gave up at this point, but Mr. Jones convinced me to spend some quality time on our porch this weekend with my seam ripper and a helpful beverage.

After ripping out the zipper, cutting and sewing in two new additional panels (one for the exterior and one for the lining) to make up for the lost circumference, and resigning myself to the use of a drawstring instead of a zipper, I was back on track.

Bonus: using a drawstring meant I needed sturdy openings for said drawstring, which means I got to sew buttonholes for the very first time! After that, all I had to do was turn down one edge to make the channel for the drawstring and attach the bottom panel and strap.

Voila: bag.

Peach and Gold Quilt: It is done.

Peach and Gold Quilt (front)

Peach and Gold Quilt (back)

Washed, dried, and wrinkly. A lot of quilters seem to love this look, but I’m still undecided. I think I like the crispness of the stitching before it’s run through the washing machine. Thoughts?


Peach and Gold Quilt

Finished size: I’ve been holding this post up for over a week because I packed this quilt away already. Rather than holding it up even longer, I’m going to say: lap size!

PATTERN: Four-patch with border, provided by the Cambridge Quilt Shop as part of their friendly, encouraging, very helpful Start Quilting class. I basically bought a sewing machine and showed up at this class, and I ended up with a quilt. Highly recommended.

FABRIC: If you’re looking for similar fabrics, I bought everything for this quilt at the Cambridge Quilt Shop except for the bit of Carolyn Friedlander Botanics on the back. The solid peach is Kona Cotton in Salmon; the two fabrics for the four-patch (the ones with randomly placed tiny gold dots) are Hoffman Brilliant Blenders in white gold and ivory gold; the large neutral squares are similar fabric with more orderly rows of tiny gold dots; a large scrap of Carolyn Friedlander Botanics Foliage in Charcoal shows up on the back; the quilt is bound with a coral fabric with tiny peach dashes on it Dear Stella in Ticking Stripe (Coral).

In which I wrestle with bias tape and binding

Making bias tape still sort of freaks me out, maybe because I’m in awe of the continuous method (aka the tube). No matter how carefully I mark and pin and match edges together, I still can’t quite wrap my head around what I’m doing. I persevered last week, though, in order to get one step closer to finishing the peach and gold quilt. I ended up with a lovely mound of coral and peach bias tape, which I promptly ruined by not paying close enough attention to my scissors as I was cutting it apart.

Well done, me.

I was able to patch the non-shredded bits together and ended up with juuuuuust enough to make it around all four edges of this lovely quilt.

Which I then ruined again by forgetting everything I know about how to make lovely, crisp mitered corners and instead following the (really rather asinine) instructions in the Quilting By Machine Singer Sewing Reference Library, which gently guided me through folding over the back of a quilt to bind it but totally bungled everything when it came to binding a quilt with bias tape. According to the book, one first binds the opposite long edges, then binds the short edges separately. This leaves one with four sad little tails, sticking forlornly off the corners of one’s quilt:

Why, Quilting By Machine Singer Sewing Reference Library. Why.

(Aside: you don’t have to look too closely at the photo of the back of the quilt to see that my top stitching left an awkward little 1/4″ flap of binding sticking out. I’m blaming this on the book, even though I’m pretty sure the width and positioning of my bias tape may have been at fault. I’m annoyed enough that I’m going back through and hand stitching the flap down, which means I probably shouldn’t have bothered to machine stitch it in the first place. THE DRAMA.)

I managed to hand stitch along one long edge and wrangle one ugly binding tail into submission. From the front, it looks okay. From the back…I long for neatly mitered corners.

Nevertheless: only three more edges to hand sew and three more tails to tack down. So close to being done!